Since iManage on-premise or iManage Work environments do not have access to the universal app catalog, an administrator of the on-premise system needs to manually configure the application package before creating the connection. To configure the application, take the following steps:
1. An admin of your iManage instance navigates to Lexis Create+ Portal and go to Integrations.
2. Click the + Connect button in the iManage on-premise card
3. Enter the public URL for your iManage on-premise or iManage Work instance.
For example, https://imanage.mydomain.company
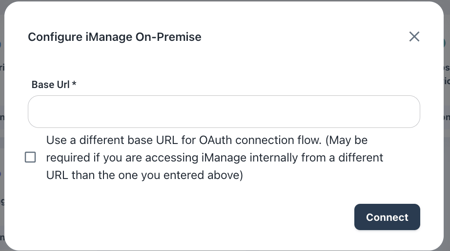
Important Note: Please use the base URL for this, e.g. https://imanage.mydomain.com instead of https://imanage.somedomain.com/login/etc.html
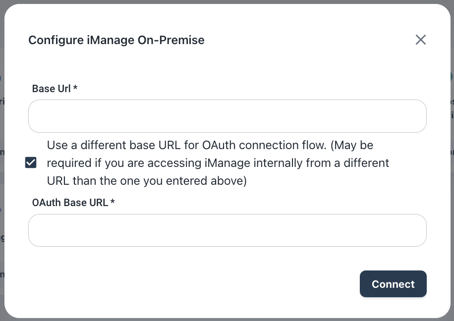
4. Add internal iManage URL for redirecting purposes
In some cases, the Public URL provided is set up especially for the Lexis® Create DMS integration, because only that URL is exposed publicly.
In this case, we need to add the internal iManage URL (which is not exposed to the public) into our back-end so that
-
-
- The service user is redirected back to Lexis® Create DMS correctly when setting up the connection
- Lawyers can be redirected to the internal iManage server to open the full documents from Lexis® Create DMS.
-
5. Lexis® Create DMS generates an API Key and an API Secret that is unique to your iManage instance. Use this information to configure the application in iManage.

6. Enable the application in the control center of iManage
An admin must enable the Henchman application in the Control Center via: Control Center > Settings > Applications > +Add Application.

Choose Configure Manually:

Copy and paste the API Key -> Client ID and API Secret -> Client Secret from the Admin Center and click on Authentication.

Paste the Redirect URL: https://dashboard.lexis.com/integrations and Allow Refresh token.

Click on Access and Allow access to all users.
Note: In older iManage instances, you may not see the option to enable the refresh token and this needs to be done through the API - see Common Issues article.
Go back to the integration guide to follow the next steps of the integration.